Fixing Customer Experience
 

At Fixie, we’re determined to advance (or fix…) how the 3D printing industry interacts with the AEC sector. From listening to our clients across the architectural, construction, engineering and property industries we have uncovered two main frustrations:

The first comes from the client side and is often due to a lack of understanding of what is involved in the production of 3D printed models. This highlights the need for further education and the desire for transparency at all stages and in all aspects of the process.

It’s the experts’ role to help clients feel comfortable in the knowledge that they have a high level understanding of how a project should progress and of what potential obstacles may arise. The key aim should be zero surprises!

Another major frustration conveyed was around how the project and communications are managed between external stakeholders and internal production teams. Improving these channels of communication will help alleviate the aches of the first point above. This improvement is heavily reliant on efficient internal working processes.

 
Our clients will have full control and approval will be as easy as pressing (3D) print

Our clients will have full control and approval will be as easy as pressing (3D) print


At Fixie, we enjoy growing the community of 3D printing enthusiasts so we’re always actively educating our clients about the processes. However, we knew that the second frustration around transparency and frequency of communications could be tackled with a fresh injection of technology.

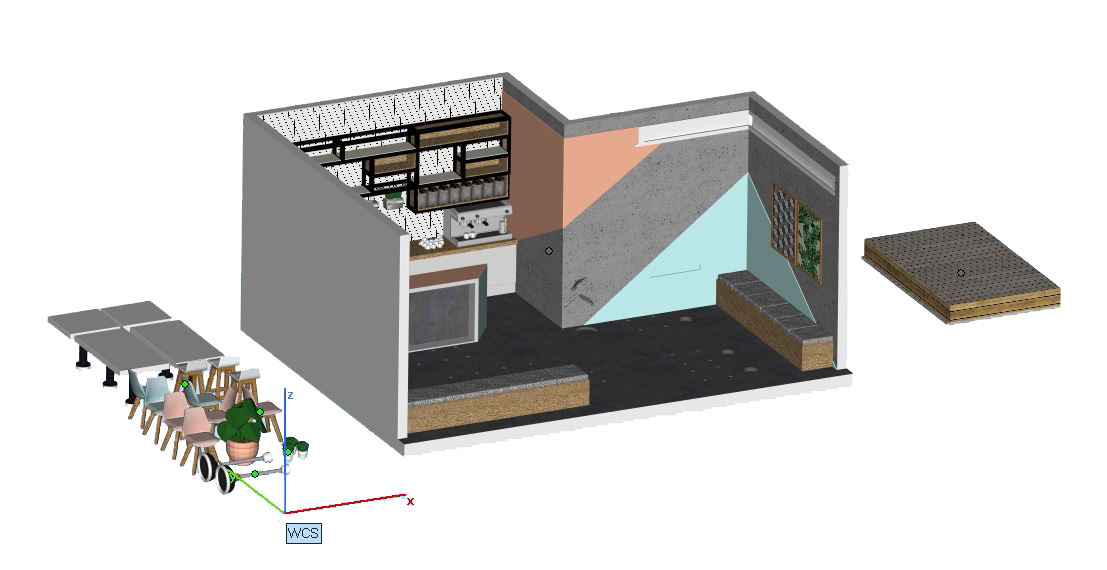
That’s why we’re thrilled to be introducing our new project tracking tool to the market. It’s our first innovation aimed at reducing friction in the 3D printing process - part of our plan to encourage greater adoption of 3D printing as the go-to solution for design communications. We’ll be sharing updates on progress over the coming weeks, but it’s fair to say that we can’t wait until we’re finished and can begin testing it with you on live projects.

 
Ronan O'Boyle
3D Printing Industry Article
 

We’re happy that Fixie are featured today in 3D Printing Industry!

It has taken a lot of long days and late hours of work to build Fixie from scratch. It’s nice to be able to share that work with the industry. We’re only getting started, but it’s nice to see the hard work paying off little by little, day by day.

3D Printing Industry summarised the first development of our service:

The Upload and Briefing tool generates quotes as well as consultation on the most relevant additive manufacturing processes for a building model. This includes Selective Laser Sintering (SLS), ColorJet printing, Stereolithography (SLA) and hand-finishing post-processing. Once satisfied, the company’s 24/7 file fixing service transforms the given digital designs into an optimized 3D printed model.

This reinforces the point that streamlining the briefing/information gathering stage is a vital part of improving the customer experience. It reminds us that our role is that of the consultant, the expert in our field and we need to guide you on the journey to finding the best solution before we can get our hands dirty with your file!

 
Ronan O'Boyle
Fixing and 3D printing a colour interior model

Fixing and 3D Printing a Colour Interior Model

As you may have seen on our Instagram, we were recently working with a colourful interior fit-out model. It brought up a few more issues than we anticipated and we’d therefore like to share how we overcame them.

(This is a specific use case of how a file is fixed – for a less technical description please follow our Fixing Series, which supports live project descriptions with a more general overview of 3D printing and file fixing principles.)

Starting Point: Importing the Model

The model was originally created in SketchUp and imported directly into our file preparation software. The textures and colours applied in SketchUp are also conveniently imported.

This can be both a blessing and a curse, as heavy textures can often slow down our software.

 
Bad edges and flipped triangles.png
 

Running Diagnostics on the Imported Model

Once imported, the model is run through a diagnostics check. This reveals all the errors in the model which must be fixed before it is printable.

Bad Edges and Flipped Triangles

As shown in the diagnostics image, this model had multiple errors indicated by coloured lines:

  • Bad edges (yellow) occur when triangles or surfaces are not properly connected, leading to gaps in the model mesh.

  • Flipped triangles or surfaces (red) indicate inverted geometry that will cause printing issues.

 
Fixie 3D Printing File Fixing Errors Single Surfaces
 

Why Single Surfaces Fail in 3D Printing

Single surfaces will not survive post-processing or may not print at all. All surfaces need to have a thickness in order to work in the 3D printing process.

Shell Thickness and Structural Integrity

Part thickness is determined by all the connected surfaces creating a shell. All parts must be one complete shell with no bad surfaces or holes in order for them to print successfully.

 
Fixie 3D Printing File Fixing Errors Shells
 

Understanding Shells in 3D Printable Models

A model can be made up of multiple shells, like those displayed in the image highlighted in green.

Why Multiple Shells Must Be Unified

Even a simple object like a chair can be made up of multiple separate shells — the legs, the back, the cushion, and even the screws if very detailed information has been supplied.

In order for the part to print correctly and not fall apart during the process, these shells need to be unified into a single shell.

The ultimate goal for any model is to create a single shell with no holes, bad edges, or inverted surfaces — in other words, no errors whatsoever.

The ultimate goal for any model is to create a single shell with no holes, bad edges or no inverted surfaces - in other words: no errors whatsoever!

File Fixing Workflow: Breaking Models into Parts

File fixing, like life, is all about breaking things down into manageable chunks to make it all seem achievable.

Once the model has been split into manageable parts, each part can be fixed individually, one at a time.

 
Fixie File Fixing 3D Printing Separate Parts
 

Post-Processing Benefits of Printing in Separate Parts

Breaking down a model can also help improve the overall finish, as it allows access to areas that require post-processing, such as hand finishing and brushing after printing.

All parts can be finished individually and assembled to bring the model together. While models can be 3D printed in one piece, breaking them down provides greater flexibility and finishing control.

 
Fixie 3D Printed Colour CJP Gypsum Powder Interior Model Cafe
Fixie 3D Printed Colour CJP Gypsum Powder Interior Model
 

Infiltration in CJP Gypsum Powder Printing

Another benefit of breaking the model up in CJP gypsum powder printing is infiltration.

How Infiltration Strengthens Colour Prints

Infiltration is the process of letting glue seep into the porous powder, giving the model strength and making the saturated colour come to life.

Common Gluing and Infiltration Mistakes

When gluing a model, it is vital that all surfaces are brushed meticulously to remove any loose surface material not removed by compressed air.

If uncured surface material remains, the end result will appear patchy and may give a bleach-like stain on the model’s surface.

Patchy Surfaces and Double Gluing

It is equally important that infiltration with cyanoacrylate is carried out quickly and efficiently. If the infiltrant dries at different speeds, shiny patches may appear — often referred to as double gluing.

All excess glue should be removed from the surface before drying to reduce the risk of these shiny effects.

Drying, Handling, and Aftercare for CJP Models

Infiltrated parts should be left to dry thoroughly before handling. Moisture can interfere with the drying process and result in white patches on the model.

Natural oils from fingers can also leave marks at this stage, so handling should be avoided until fully dry.

Preventing Discolouration and Damage

For aftercare, it is important never to get a CJP gypsum powder model wet. Water will react with the material and cause a bleaching effect.

Similarly, placing the model in direct sunlight will cause a CJP 3D printed model to discolour over time.

Final Thoughts

We hope this hasn’t been too much to take in and that, together with our supporting blogs, it helps make sense of the work we do for your models at Fixie.

If you’d like to know more, we’d love to hear from you directly at info@fixie3d.com.

File Prep: How to prepare your design model
 

Over the past number of weeks we have been happily at work on our first projects at Fixie! Some have been complex and involved, whilst others have only required a quick fix. However, in all cases we’ve noticed the same issues during the early stages. These are caused by the condition and content of the model supplied. They cause the entire quoting, fixing and printing process to be slowed down. We thought it would be good to share the key steps that can be taken prior to supplying your model to us in order to avoid this.

Before you start:

We recommend that you save a copy of your working file and label it ‘to print’ or similar. This ensures that any of the changes you make, that are purely to speed up the 3D Printing process, don’t affect your ongoing work.

1_Remove unnecessary layers

In the new file you have created take a quick look at the model to eliminate anything that isn’t needed in the print. This could mean sketch and draft elements and obviously any layers that are turned off, as you don’t need them. This is an important distinction as all layers in a model will be imported and turned on in our File Fixing software. This can often prolong the process as we need to identify what is actually required in the print. A little housekeeping at this stage will make a big difference.

 
Fixie 3D Model Printing Layer Control
 

2_Trees

Trees are very pretty. We like to see them in your designs. However, these have often been placed in the model as 2D elements, which are not printable, or as heavy and complex 3D elements. Both slow down the model assessment stage as they can make the file unworkable.

Trees can be printed at certain scales and SLS printed trees are pretty special. However, generally if you wish to have trees in a print we add these by hand afterwards. This creates a nice contrast and the only information we need for this is a tree plan - easy!

Fixie 3D Model Printing Trees

This process may be making you feel a little uncomfortable as it holds up a mirror to your modelling techniques, brutally exposes them to the cruel light of day and leads you on an unwanted introspective journey…But fear not, we’re all in it together and it’s the little things that go a long way to making the 3D printing process easier for all.

 
Fixie 3D Model Printing Flipping Out Screaming
 

3_People/Animation

Not dissimilar to trees: people and vehicles are placed into your digital model to add life. However, people are often too small to print (1:500, or 1:750 at a push, are probably the smallest scales that you would look to place people in a model). And depending where you took your vehicles from they could have the entire engine intricately modelled - this is the key point, if you can’t see it or it is an unnecessary level of detail then it shouldn’t be in the file!

4CCCA7CC00000578-5793345-image-a-18_1527810333559.jpg

4_Detail

Whether it’s Fork Handles or Four Candles: both are likely to be unnecessary in your model. In fact, if you’re only printing the exterior you can delete everything that’s internal (but don’t waste too much time on this as our software does it quickly - just delete those IKEA furniture layers!).

The main point with detail is to realise that if you have 500 door handles in a model, there are likely many other unnecessary elements that will slow down the process and ultimately add cost. To understand this point and what will actually appear at the scale you are printing, will also go a long way to understanding what is possible in 3D printing and what makes it possible.

If you have any related questions, please contact us at fixers@fixie3d.com, we’re here to help.

Your design is perfect, but your file may not be...

Fixie - it’s all in the name really: your design files need to be fixed before 3D Printing.

That’s why we set up Fixie, to scratch this task off your ever-expanding list. You’re the building specialists: we’re the 3D Printed model specialists!

 
Fix and Print_2@5x.png
 

Whilst sometimes there is only a small amount of file preparation, there are multiple factors which cause issues. This could be caused by how the digital model was originally made, how it was imported and interpreted by our 3D printing software and also how you would ultimately like to see your design represented. The requirements to make detailed features printable at different scales varies greatly. We don’t think it should be your job to worry about whether your design will 3D print or not!

We want to share all of these factors with you to help you understand the work we do at Fixie to get your model print ready, according to your specific brief.

Over the coming posts we will share our expertise on:

If you’d like further information, we’d love to hear from you directly.